Art Print Condition Guide: What to Check Before You Buy
A brown spot in a blank margin and a crease through a face can look equally small in a listing thumbnail. They give you different buying decisions. Start with the whole sheet, then ask for the view that shows where the damage actually sits.
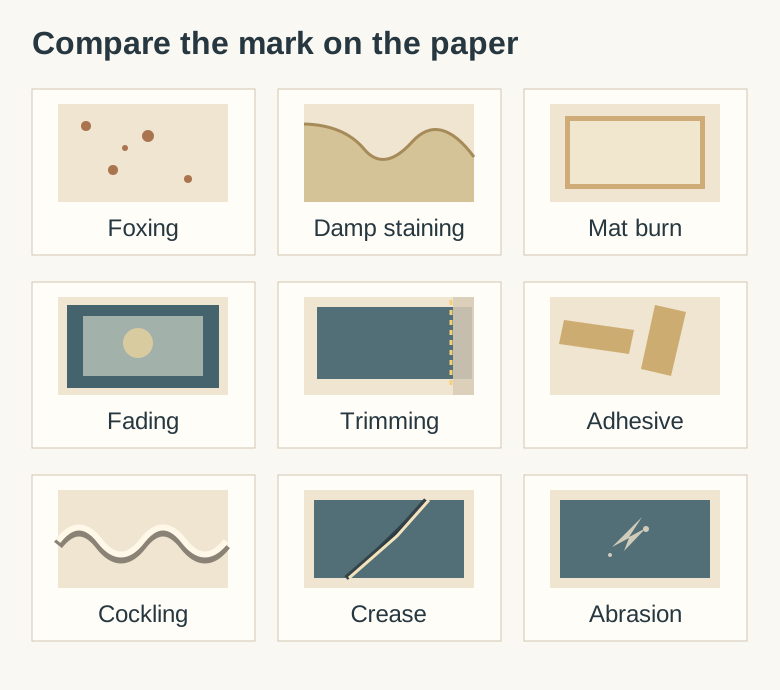
Match the visible mark to a closer inspection
| Condition | What it may look like |
|---|---|
| Foxing | Small rust-colored spots |
| Possible mold or damp | Fuzzy deposits, staining or a tide line |
| Mat burn | A brown line at the old window opening |
| Fading | A color change at a protected border |
| Trimming | Narrow or missing margins |
| Tape or adhesive | Amber stains, shiny patches or strips on the back |
| Cockling | Broad waves across the sheet |
| Creases | A sharp fold that catches the light |
| Abrasion | A rubbed or rough patch with lost ink |
Foxing
Small rust-colored spots. Ask for front and back views in even light. Note which spots fall inside the image and which stay in the margin. Their color alone cannot establish the cause or whether they can be reduced.
Possible mold or damp
Fuzzy deposits, staining or a tide line. A phone photo cannot establish whether mold is active. Ask about water exposure and storage. If the seller reports dampness or loose growth, leave the frame closed and have a paper conservator assess it before you bring it into a collection.
Mat burn
A brown line at the old window opening. A wider new mat may reveal an old rectangular stain. Request an existing out-of-frame photograph showing where the line falls relative to the image and the signature.
Fading
A color change at a protected border. Ask for a daylight-balanced photo without filters and compare it with a documented impression. A change under the mat can be evidence of exposure. A different camera or an intentional color variant can also change appearances.
Trimming
Narrow or missing margins. Get the actual sheet dimensions and the image dimensions separately. Compare the sheet with a documented impression on the same paper. A naturally uneven deckle edge and a cut edge can both be original.
Tape or adhesive
Amber stains, shiny patches or strips on the back. Ask whether the print is attached just at hinges or stuck down across the back. A photograph of the reverse may show old tape that the front hides. Leave the tape in place for assessment.
Cockling
Broad waves across the sheet. Ask for a low side view. Mild movement can come from the printmaking process. Tight mounting or moisture can also distort the sheet. Ask if the rippling has changed since framing.
Creases
A sharp fold that catches the light. Ask for angled views from opposite sides and check whether the fold crosses printed ink. A flattened bend can leave a permanent break in the paper or ink surface.
Abrasion
A rubbed or rough patch with lost ink. Request a close view of the mark in even light and side light. A reflection on glazing moves with the camera. Missing ink stays in the same place on the sheet.
When the frame hides the answer
Get a straight-on picture of the entire framed print, close-ups of the affected area and any existing views of the back and sheet edges. If the frame is sealed, record the condition as examined in frame. Have a framer or conservator open it when the purchase depends on what is underneath.
When is it worth pursuing?
For a readily available edition, compare the delivered cost of a cleaner impression before paying for examination or treatment. For a hard-to-replace print with a crease through the image, ask for an independent written assessment and estimate before agreeing on a price. If the seller can only show the framed front and the sale is final, decide whether you would still want it with the hidden condition unresolved.